Tuesday, July 21, 2009

DEATH to RAGU & PREGO!

I'm not even sure I should be blogging about this, because it's such a PASSIONATE and HEATED topic for me. Italian's are hot tempered as it is, but we boil over the topic of food. While I live in Staten Island now (properly dubbed as "Staten Italy"), I didn't grow up with many other Italians, and I am the furthest thing from a "guidette." But if I hear one more person exclaim, "I made spaghetti and meatballs last night!", and then make a reference to some middle-American, disgusting jar sauce, I might cry. Like seriously, tears. It breaks my heart.

I want to reply, "You made NOTHING! You boiled water for spaghetti, and poured store-bought garbage on top of it! SHAME!" I actually get flashblacks of watching Sandra Lee "make" her Kwanzaa Cake (please check out the video to get a sense of my heartbreak).

I think the height of my rage was at my former job. A fellow coworker, let's call him D (actually, that's what we all called him), would come in for lunch with dinner leftovers. One day, he was eating leftover spaghetti, and I overheard (my cubicle was located close to the cafeteria) him rave about the Ragu 'sauce' covering the poor, forsaken pasta. I immediately dashed over to the cafeteria (it was literally a foot away), and scolded him. He gave me a simple explanation. "I'm not Italian. I don't know the difference. Tastes good to me." Suddenly, it all made sense.

I immediately went home that night and whipped up 2 containers of sauce for him, and told him to "see if he tastes a difference." Actually, I think he purposely infuriated me to get free cooking. And it totally worked. Dammit.

Maybe if people realized how easy real, authentic Italian marinara sauce is to make, they would cut the shameful jar brands out of their lives for good. Maybe if they realized you can make a week's worth at a time, they would stop ripping my heart out and stomping on it.

Here is my recipe. I honestly don't think it should even count as a recipe, because growing up in my house, it's simply common sense. But here goes...


Traditional Marinara Sauce

Makes 2 medium containers


Ingredients

16-oz tomato sauce (I used 2 8-oz cans)
28-oz crushed tomatoes (I used 1 large can)
16-oz diced tomatoes (Optional...depends if you like big tomato pieces in your sauce. If not, skip it)
Note: I used 1 medium can of Hunt's Fire Roasted Diced Tomatoes. This is my favorite brand. I've tried the Del Monte diced tomatoes (big up to Costco!) and they sucked major ass. You can actually make your own fire-roasted tomatoes by brushing small (grape, cherry, or plum) tomatoes with olive oil, salt, pepper, and garlic powder, and roasting them in the oven until they explode (yea baby). I was lazy. I went with the can.
3 cloves garlic, minced
2 medium white onions, diced
Sugar, to taste
Red pepper flakes (optional)
Olive oil
Salt & pepper
Fresh basil (optional)
Note: For a meatsauce, simmer sauce with meatballs, panchetta, Italian sausage, etc. You can also create a fish sauce, simmering the sauce with shrimp, lobster tails, crab claws, etc. This is a base recipe, and very versatile. I used turkey meatballs in my most recent batch.


My arsenal


Steps
-Fill a deep pot or dutch oven (ha) with cans of tomato sauce, crushed tomatoes, and diced tomatoes. Simmer on low heat.
-In a frying pan or skillet, heat olive oil, and begin frying diced onions over medium high heat, stirring occasionally. (You might have to fry the onions in 2 separate batches. I did.) Season with salt, pepper, and red pepper flakes, if desired.


-When the onions are almost caramelized, add the minced garlic to your pan, and cook for about 3 minutes. The garlic will cook much quicker than the onions.
-Transfer onions and garlic to the sauce pot and continue to simmer for at least an hour.
-Taste your sauce constantly! This is the most important step in making an authentic marinara sauce. If the sauce tastes too acidic, add sugar. This counterbalances the tomatoes. Too bland? Add salt & pepper. Too mild? Add more red pepper flakes.
-At this point, if you are adding any meat, fish, vegetables, or herbs (such as fresh basil or parsley), do so now. Continue simmering until the meat/fish/veggies are cooked through, and until your sauce tastes delicious.
Note: I prefer making sauce the day before, because it always tastes better after all the flavors have time to meld together in the fridge.


You'll thank me later.


The best part is, you can do so much with your leftovers. Baked ziti, chicken parm, polenta...the possibilities are endless. When I make marinara, I left to reserve a little extra to make Vodka Sauce. Penne alla Vodka is one of my favorite meals to order out, so it only makes sense to recreate it at home as often as possible.


Vodka Sauce

Makes 1 container

Ingredients

-1 container Marinara Sauce
-1/2 cup vodka
-1/2-1 cup heavy cream
-Grated cheese (Asiago, Parmigiano-Reggiano, and Pecorino Romano all work well)

Steps
-Pour sauce into a blender, and "purée" until smooth.


-Pour puréed sauce into a frying pan or skillet. Simmer on low heat (it will start bubbling and splattering almost immediately).
-Add 1/2 cup vodka to your sauce, and simmer for approximately 20 minutes. Taste your sauce. If it tastes too vodka-y, it probably needs to simmer even more. You want both your sauce and your vodka to reduce in your pan.
-Before serving, began pouring in your heavy cream, and simmer until heated through. The more heavy cream you add, the lighter and creamier your sauce will be. I added about 3/4 of a cup.


-Add a handful or 2 of grated cheese, and stir until melted. Take sauce off of heat.


Can I get an "Amen?"


Wednesday, July 15, 2009

Would you like some dinner to go with that fat?

After several days of (healthy) fish and chicken, I was craving something fatty and fried. There's just nothing more pleasurable than eating a greasy, heavy meal, and passing out shortly after. Or sweating profusely as your body tries to burn off all the fat (I believe these are called "Meat Sweats"). I mean, really, being a size 5 is overrated. The way the weather has been going, it's not like I'll be in a bikini anytime soon. Or at least that's my justification.

So I went for the classic "meat 'n' potatoes" meal. OK, so I still had my jumbo bag of Costco red potatoes from this recipe, and I didn't want them to go bad. That would be a waste of food, and my food motto is the same as my alcohol motto--YOU DON'T WASTE! There are starving children in the world that would kill for that last bite of mac'n'cheese...and that shot of Patron. (By the way, have you ever realized how little sense that makes? If I finish my meal, is that going to satiate a starving child's hunger? 'Look at me, I'm eating and I'm not even hungry! The world's starvation problem is SOLVED!') Yeah, I go off on tangents. Gotta problem?

Anyway, back to using my jumbo bag of Costco red potatoes. In essense, it means one less thing to buy (and you know I'm one cheap bitch). This ultimately backfired when I realized I didn't have a potato masher (worst chef EVER!) and had to spring $6.99 for a plastic piece of crap. OUTRAGE.

In all good conscience, I can't take full credit for this one. Because the BF actually made (and suggested) the porkchops (Kitchen Bitch). I guess he'll do anything to avoid another squash night.


Breaded Porkchops & Red Potato Mash

Ingredients
Red Potato Mash:
-Red potatoes (about 24...this will make a LOT of leftovers...seriously. We had 3 nights dinner, and then brought the rest over to a BBQ. And they had leftovers.)
-Butter, about half a stick
-Chives (Fresh is always better, but I used dried because I had them on hand)
-Heavy cream (approx. 1 cup)
-Sour cream (approx. 1 cup)
-Garlic powder
-Salt & Pepper

Breaded Porkchops:
-2 large porkchops (I used center-cut chops)
-Flour
-Paprika
-1 egg
-Worcestershire sauce
-Italian-style breadcrumbs (4C Seasoned Breadcrumbs are my standby fave)
-Grated cheese (Parmigiano-Reggiano, Pecorino Romano, and Asiago all work well here)
-Olive oil
-Salt & Pepper

Steps
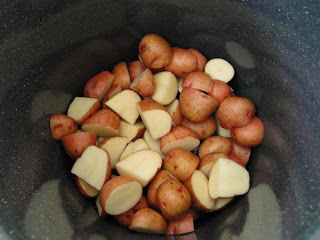
-The potatoes will take longer than the porkchops, so I always start with them first. Wash and half (or quarter, depending on size) your potatoes. You can peel them if you want, but it's extra work and I actually prefer skins in my mash.
-Place potatoes in a large pot or dutch oven (ha), and cover with water.


-Bring to a boil. These are small potatoes, so they should be ready to mash after about 10 minutes of boiling. If your fork can easily pierce through the potato, they're done.
-While your potatoes are boiling, you can start preparing your porkchops to save time (get yo' multitaskin' on). In a frying pan or skillet, begin heating olive oil over high heat.
-Set up your dipping stations (see previous post) by setting up 3 bowls, as follows:


  1. Flour, seasoned with salt, pepper, and paprika.

  2. 1 egg, beaten, with a few drops of worcestershire sauce (sounds random, I know).

  3. Breadcrumbs, seasoned with grated or shredded cheese.

-Dip the chops into the flour, egg, and breadcrumbs, in that order. Place into the heated oil, frying each chop for about a minute per side. Turn the heat down to medium high, and continue cooking the chops about 5-7 minutes per side, or until they are no longer pink in the center.
-Back to the potatoes. They should be done boiling, so drain them and place them back in the pot.
-While your chops fry, begin to mash the potatoes inside the pot. Gradually start adding your butter (1 tbsp at a time), heavy cream (1 splash at a time), and sour cream (1, um, dollup at a time). I cannot stress the word "gradually" enough. Too much too soon = gross mushy crap.
-Season generously with salt, pepper, and garlic powder. Sprinkle in chives.
-Mash and mix the potatoes until they are the way you like them. For instance, I like lumps, some people hate them. To each his own (except my way is better).

The chops should be done right around the time you finish mashing your potatoes to death. As a result, they're both hot and ready to serve at the same time (sounds dirty).


Damn son.

Thursday, July 9, 2009

DEEEEZ NUTS.

If this title doesn't draw you in, I don't know what will.

But seriously, I like using nuts in my dinners. (Ha.) Almonds and walnuts are my favorites, because they seem to last forever. I love pine nuts, but they are expensive and get rancid after a week. I even substitute almonds for pine nuts in my pesto, but that's a whole other story and blog post.

I had some leftover almonds, and some leftover tilapia (see previous post), and a bunch of other random crap. Somehow, I got this recipe below, and it received such high praise (from the BF and...uh...me) that I'd make out with myself if I could. I'm that good.


Almond-Crusted Tilapia

Makes 2 servings

Ingredients
-2 tilapia filets
-1 cup almonds
-Asiago cheese
-Flour
-1 egg
-Lemon pepper
-Garlic powder
-3 tbsp butter
-Olive oil
-Lemon wedges

Steps
-Place almonds into a blender. (No need to toast them first, since you'll be frying them up later.)
-"Purée" or "chop" (or whatever your blender says) the almonds until you're left with a fine, grainy powder.
-Transfer almond powder to a bowl, and mix with a handful or so of Asiago cheese.
-In other bowl, beat egg with a dash of lemon pepper and a dash of garlic powder.
-Fill yet another bowl with flour.

All behold my dipping stations. It makes the most of my (lack of) counter space.

-Over medium high heat, begin melting your butter in a skillet or frying pan. Once the butter starts bubbling, add a splash of olive oil, and allow that to heat, as well. (The olive oil prevents the butter from burning over high heat, in case you give a crap.)
-Meanwhile, step back over to your dipping stations. Dip your tilapia filets into the flour, the egg mixture, and the almond-and-cheese mixture, in that order.
-Place the coated filets in your skillet, and fry over medium high heat for about 2 minutes per side. Slightly lower your heat, cover your pan, and continue cooking for about 5-7 minutes (depending on the thickness of your filets).
-Serve with lemon wedges...if you want.


Seriously...I'm awesome. This was unbelievable.

Monday, July 6, 2009

Because the Costco tomatoes are still fresh.

4th of July weekend. A weekend in the Poconos full of hamburgers, hotdogs, and... rice and beans. Not exactly all-American, but I never complain about delicious Puerto Rican food (and I gotz da recipe, so stay tuned).

I returned Sunday night to my ugly kitchen to discover the Costco grape tomatoes are still fresh! Things like this excite me, for several reasons.

  1. I don't have to spend more money on food.
  2. I didn't waste money buying a jumbo crate of grape tomatoes. (Click here or here to remind yourself of their sexiness)
  3. I have no life.

Combine that excitement with the bag of Costco tilapia filets chillin' in my freezer, and you've got yourself...


Braised Tilapia with Grape Tomatoes & Onions

Makes 2 servings

Ingredients
-2 tilapia filets
-Grape tomatoes (about 2 handfuls), halved lengthwise
-Large white onion, chopped
-2-3 cups chicken stock (Organic Free Range Chicken Broth by Pacific Natural Foods... It makes a difference, trust. And if you buy it from Costco it's cheaper than Campbell's!)
-Garlic powder
-Olive oil
-Salt & pepper

Steps
-Heat oil in a skillet or frying pan over medium high heat. Add your chopped onions to the heated oil, stirring constantly for about 10 minutes, or until your onions just starting to brown. At this point, your house should smell like B.O.--delicious!
-Add your halved tomatoes to the onions, stirring until heated through (about 2 minutes).


-Transfer tomato & onion mixture to a plate, reserving your oil in the pan.
-Meanwhile, season both sides of your tilapia filets with garlic powder, salt, and pepper. Place filets in the hot oil, frying each side for 2 minutes.
-Pour your reserved tomato & onion mixture on top of the filets, along with enough chicken stock to cover. Cover pan (I just use tin foil, 'cause I'm fly like that), and turn heat down to a simmer.


-Simmer for 10 minutes, flipping the filets halfway through to ensure even cooking.

Ta-da!


This recipe is much easier than it sounds (and it sounds pretty fancy, no?) You can seriously "braise" anything (even humans, although I hear the meat isn't that tender). Here's another meal I made swapping the tilapia filets for chicken breasts (also from Costco--I swear they aren't paying me), and the grape tomatoes (they finally ran out) for baby bello mushrooms.


Braised Chicken Breasts with Baby Bello Mushrooms & Onions

Makes 2 servings

Ingredients
-2 boneless, skinless chicken breasts
-Baby bello mushrooms, sliced (about 2 handfulls)
-Large white onion, chopped
-2-3 cups chicken stock
-Garlic powder
-Olive oil
-Salt & pepper

Do you really need me to repeat the entire recipe, substituting "baby bello mushrooms" for "grape tomatoes," and "chicken breasts" for "tilapia filets?" Ok, fine, you needy bastard.

Steps
-Heat oil in a skillet or frying pan over medium high heat. Add your chopped onions to the heated oil, stirring constantly for about 10 minutes, or until your onions just starting to brown. (Repeat B.O. joke here)
-Add your sliced baby bello mushrooms to the onions, stirring until heated through (about 2 minutes).

-Transfer mushroom & onion mixture to a plate, reserving your oil in the pan.
-Meanwhile, season both sides of your chicken breasts with garlic powder, salt, and pepper.
-Place breasts in the hot oil (sounds kinky), frying each side for about 3-4 minutes. If you're using chicken cutlets, a minute or 2 per side should be fine.

-Pour your reserved mushroom & onion mixture on top of the breasts, along with enough chicken stock to cover. Cover pan, and turn heat down to a simmer.

-Simmer for 10-15 minutes, flipping the breasts halfway through to ensure even cooking.

HELL YEA.

Thursday, July 2, 2009

Vodka Sauce? No... just vodka.

Making risotto is no small feat. Especially when you're making risotto while drunk off Bloody Mary's. And your Mary is more Vodka-y than Bloody.

Actually, I'm enduring the gruelingly long process of making risotto because I want an excuse to make butternut squash.

Yes, this = butternut squash.

About a year ago, I became obsessed with squash. I'm not sure why. Maybe it's because I never had it growing up (aside from zucchini, but who knew that was squash?), and maybe it's because there's such a variety. And maybe it's because it's SO CHEAP. Anywho, a year ago I became obsessed with squash, and insisted on making every type of squash every night for dinner. Butternut squash, acorn squash, delicata squash, spaghetti squash... and the list goes on. My boyfriend would come home after a long, hard day of work, expecting nothing less than a rare, juicy steak, only to see a roasted, orange concoction strewn upon his plate. "What the hell is this?!" "Hubbard, obviously," I'd reply, pushing a baked orange slice towards him, smothered in honey, brown sugar, and pecans.

I think the last straw was when I returned, ecstatic, from King Kullen with a large Kabocha (Japanese Pumpkin). He responded by grabbing it out of my hands and rolling it down the street (and we live on a hill), and I had to run after my precious Kabocha before it got hit by one of the many Nissan Muranos that speed down our block.

After autumn, there hasn't been much squash variety in any local supermarket or farmer's market, but I have had several packs of frozen butternut squash collecting freezer burn since December. You know me, I'm always an advocate for fresh food over frozen, but I'm also an advocate of not running to the store when there is already food in your house. Combine that with a giant box of Arborio Rice that's been collecting dust in my pantry, and you've got yourself some Butternut Squash Risotto.


Butternut Squash Risotto

Makes 2 (LARGE) servings... Seriously, we couldn't even finish it all. So that probably makes it about 8 servings.


Ingredients

-1 medium butternut squash--or, in my case, 1 12-oz box of frozen precooked winter squash (usually a combination of butternut and acorn squash)
-2 tbsp olive oil
-4 tbsp butter
-6 cups chicken stock (I'll be using the Organic Free Range Chicken Broth from Costco that I mentioned here ...delish!)

-1 medium white or yellow onion (or a few shallots, if you want to be fancy), chopped
-1 vacuum-packed packet of Arborio Rice (about 17.5 oz of dry risotto, or 500 g)

-1/2 to 1 cup grated Parmigiano-Reggiano (depending on your taste)
-Salt & pepper, to taste

Steps

-For those of you using frozen winter squash, you've got it easy. Place the squash in a saucepan with 1/4 cup of water. Bring to a boil over high heat, and reduce heat to a medium low. Cook for about 8 minutes, stirring every 2 minutes to ensure even cooking.
-For those who have an actual butternut squash, you have to do a lil' prep work. First, half the squash lengthwise with a sharp knife (try not to cut off any fingers... I hear the taste of blood doesn't mesh well with risotto). Use a large spoon or ice cream scooper to remove all the seeds and stringy crap in the center of the squash. Brush the squash halves (not the stringy crap) with olive oil, salt, and pepper, and place in a baking pan, cut side up.
Tip: Add about 1/4 cup water to the baking pan, to keep squash from drying out.
-Place your baking pan of orange deliciousness in the oven at 350°F for anywhere from 30 to 60 minutes (you'll want to occasionally check if your fork could pierce the flesh easily...that means it's done). Remove baking pan from oven. Allow to cool until manageable. Cut squash into tiny cubes, place in a bowl, and mash together. Purée mash in a blender to get rid of any remaining lumps, adding a little water if the mixture gets too pasty. Set aside.
-Meanwhile, place your chicken stock or broth in a saucepan, and simmer until hot.
-At the same time (I hope yo' azz could multitask!), you should be heating the olive oil and butter in large pot or dutch oven (hahaha dutch oven... I really can't type this without laughing). Why both oil and butter, you ask? I'm sure you didn't ask, but I find this interesting. Well, since you're so interested, the butter adds the flavor and creamy texture to the risotto. However, butter burns extremely easily, so the olive oil helps give the butter a little bit more staying power. Now, you can sleep easily knowing why both greasing methods are used in this recipe!
-Add your chopped onions to the heated oil/butter, stirring constantly for about 10 minutes, or until your onions are transparent, but not caramelized.

Multitasking at its finest

-Add rice to the onions, stirring to coat the grains with the oil/butter. Stir for about 2 minutes, and then add a ladle full of chicken stock to the rice, with a dash of salt and pepper. Continue stirring (does this count as an arm workout?) until the stock is absorbed. This should take about 5-10 minutes.
-Now's the time to stir in your butternut mash, too. (Little bit at a time... you don't want to overwhelm your risotto with squash. Add a ladle-full at a time, and taste. Taste squash-y enough? Stop.)
-Keep adding a ladle or 2 of stock to the rice, stirring constantly until it's absorbed (and now you understand why I must be drunk to cook risotto).
-Continue this process until your rice is "al dente," and neither dry nor swamped in liquid.
-Turn off the heat, mix in a little Parmigiano, and you've got yourself some freakin' risotto!

PS: This will murder pretty much any diet you're on. But it's so worth it.


Wednesday, July 1, 2009

Words of wisdom, from a practicing Pastafarian.

I don't think there's anything in the world I like more than pasta. Well, maybe cheese, but I don't make my own cheese. Yet. Maybe if I had a farm... Anyway, I'm getting off track. Back to pasta. Mmmmmm, pasta. My issue with pasta is that I can eat 3 giant pots of it and not feel full. Or keep eating, and not realize I'm full until an hour later, when I have to undo a button and a zipper, and spark a few "How far along are you?" remarks.

But that's OK. Because the deliciousness (and cheapness) of pasta makes all of that worth it. Plus, it's a great way to use up leftovers...and all that bulk Costco stuff.

For today's recipe, I'm dipping into my Costco supply of roasted red peppers, asparagus, and grape tomatoes.

I'm showing you them again, because they're sexy.

Here goes...


Cellentani with Roasted Garlic, Asparagus, Grape Tomatoes, and Red Peppers

Makes 2 servings*
*Please note that my boyfriend and I are animals, so 2 servings equals about 6 servings in most cultures.

Ingredients

-1 box Barilla Cellentani pasta
-2 big handfuls of grape tomatoes
-5 stalks of asparagus, tough ends cut off
-1 large roasted pepper, sliced into thin strips (obviously, homemade roasted red peppers are better, but I have a big jar--see "Roasted Red Pepper Purée"--and I let nothing go to waste)
-3 cloves of garlic, peeled and sliced
-Olive oil (enough to coat your pan)
-Asiago cheese (Parmigiano-Reggiano and Pecorino Romano work well too, but asiago is my favorite when available)
-Red pepper flakes
-Salt & Pepper, to taste

Steps

-Start boiling water for pasta, and set a pan coated with olive oil over medium high heat.
-Meanwhile, wash and chop asparagus into bite size pieces. Drop into the oil-coated pan, move pieces around to coat with the oil, and begin roasting.
-Wash and half grape tomatoes, set aside.
-As the asparagus becomes fork-tender and starts to brown, drop the sliced garlic into the pan. Stir constantly for 2-3 minutes to avoid burning.
-Your pasta water should be boiling by this point. Drop in the box of Cellentani, and cook for about 10-12 minutes.
-While the pasta cooks, stir the halved grape tomatoes into your pan, and mix until they start to burst and the skin starts to shrivel.
-Stir in the roasted red pepper strips, and mix until heated through. Season with red pepper flakes, salt, and pepper. Remove pan from heat.

Dayummmmm! And, uh, you might want to step back while everything is roasting, because when you have a pathetically small kitchen like me, you WILL get scalded by flying hot oil. Trust.


-Drain pasta, and toss with pan mixture to coat.

Tip: As long as everyone likes cheese, add the shredded Asiago to the entire pot of Cellentani immediately, so that it melts and becomes stringy. Mmmmmm...

Mangia!

New blender = Sorbet for lunch

Although it's a little soft to be a sorbet, and it contains dairy. Gelato? Is that what this is?
Anyway, here's what I had for lunch today.

Berry Vanilla Gelato... Or Something Like That

Makes 1 serving... one giant bowl of a serving

Ingredients

-1 handful frozen strawberries
-1 handful frozen blueberries
-5 large ice cubes
-3 tbsp vanilla yogurt

Steps

-Microwave frozen strawberries and blueberries on "Defrost" setting for about 60 seconds. (This isn't necessary, but it makes the "gelato" easier to blend).
-Place ice cubes in blender, followed by yogurt, blueberries, and strawberries.
-Purée until smooth.
Tip: You can add sugar or honey if you'd like a sweeter "gelato." For me, the vanilla yogurt is good enough.
Tip: If you'd rather drink your daily fruit and dairy serving, blend on a higher setting, such as Liquefy or Frappe.


You can thank me later for the brain freeze.